Thursday, August 9, 2012

3 Exciting Things to Share!!

Okay, friends! I am super excited about three things I want to share with you today! =) First up... TpT is having a Back-To-School Sale on August 12th and 13th. That's only 3 days away! TpT is offering a 10% discount on top of the discount that many sellers are offering. I am putting all of my items on sale for 20%. Combined with TpT's offer, you can get 28% off all my items! Just use the code BTS12 when checking out. Click the picture below to see a list of other sellers who are participating in this sale!


This is a great way to stock up on items for the new school year! I know I have many items on my wishlist that I can't wait to purchase. Be sure to start filling yours now! =)

Okay, next up... I am so pumped to use the new 2nd Grade ELA Common Core Vocabulary Cards that I purchased from Jaime at Bright Concepts 4 Teachers! These are amazing!


Each card has the vocabulary term and a picture, diagram, or explanation of each term. I love that the font is bold and colorful- it will really stand out on my new term wall! Here is how I'm planning on using these vocab cards:

1. When we start a new unit of study, I plan on displaying the vocabulary cards that go along with the unit in a pocket chart on my whiteboard.

2. As we learn about each word, I will take the card down to show the kids and explain the picture or explanation. I will then put the card back.

3. Throughout the unit, we will review the words in fun ways such as playing games with them, illustrating the words, etc.

4. At the end of the unit, I will hang the vocabulary words on the term wall in my classroom. They will stay here until the end of the school year.

5. We will continue to review the words on the term wall and encourage students to use the cards if they forget what one of them means.


Want to know the best part about these cards?! They are going to be 28% off in Jaime's store on the 12th and 13th during the Back-To-School sale! Stock up now and get laminating! You will want to have these around for a long time!

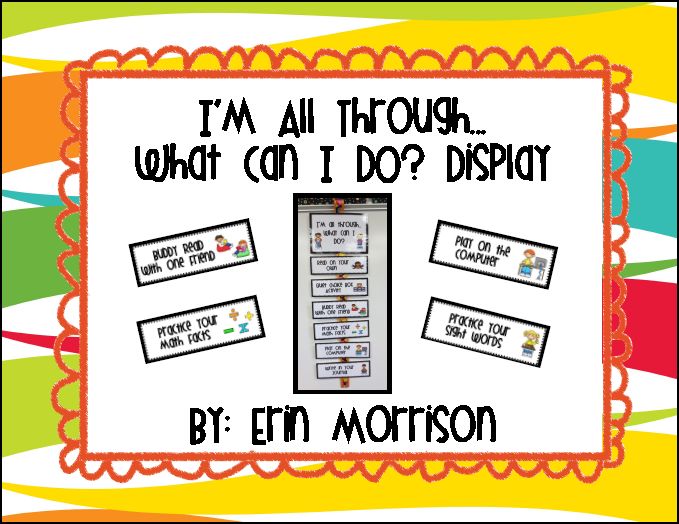
And for the third and final thing I'm excited to share... my new "I'm all through, what can I do?" options display!


How many times have you heard your students say, "What do I do when I'm all done?" I know I hear it all the time even though they KNOW what their choices are. This display is an easy way to change their options for what to do when they complete work early. Just print the cards, laminate, and attach a piece of Velcro to the back. Use a long piece of ribbon with Velcro so that you can easily switch out the cards for the choices each day! Choices include (you can use any or all of these- you pick!): read on your own, read with one buddy, write in your journal, play a math game, play a spelling game, practice your math facts, practice your spelling words, do an activity from the quiet choice box, clean your desk, draw a picture, play on the computer, practice your sight words, and a blank card for you to customize. This item will also be 28% off in my TpT store on the 12th and 13th!

Hope you have a great Thursday!


Wednesday, August 8, 2012

Organizing Your Common Core Posters

Okay, now that you've got 150+ Common Core standards posters to display in your classroom, how do you organize them?! This was my dilemma over the past couple of days. I wanted an easy way to organize my standards cards that didn't take up much space. I thought about the storage drawers (too bulky), binder clips for each subject (too annoying to clip and unclip each time), and a tub with dividers (too big). While browsing through the office supplies section at Wal-Mart, I found a check expanding file that I thought would be perfect! Today, my goal was to get the posters organized by strand and filed in this organizer. Here is how it turned out:


This is such an easy way to organize all of these posters and it only cost me a couple of bucks! The file that I bought has 12 dividers and it worked out perfectly with each subject and strand. Here's how I organized them:

1. Reading: Literature
2. Reading: Informational
3. Reading: Foundational
4. Writing
5. Speaking and Listening
6. Language
7. Math: OAT (Operations and Algebraic Thinking)
8. Math: NBT (Numbers and Operations in Base Ten)
9. Math: MD (Measurement and Data)
10. Math: G (Geometry)
11. Science
12. Social Studies

If you'd like to learn more about these Common Core "Kid Friendly" posters, click on the pictures below!

1st Grade Common Core Standards Posters- "Kid Friendly"


2nd Grade Common Core Standards Posters- "Kid Friendly"


3rd Grade Common Core Standards Posters- "Kid Friendly"


4th Grade Common Core Standards Posters- "Kid Friendly"


Tuesday, August 7, 2012

Monday Made It {a day late!}


I can't believe this is my first Monday Made It! I've made many things over the summer and have been following everyone's creations, but have yet to post one myself! I am so excited to use the "Teacher Toolbox" that I created last week. I love any and all things organization, so when I saw this idea on Pinterest, I knew I had to make it.


I'm not completely finished adding the words to each drawer, because I'm not sure what all I want to store in here. Let me tell you though- my desk and drawers have never been more organized because I moved everything into this! To make this toolbox, I just used solid colored scrapbook paper, black and white polka dot tape, black scrapbooking letters, clear packaging tape, and this organizer from Lowes:

Stack-On 22-Drawer Storage Cabinet

It was super easy to make and is going to be a big help with keeping things organized. I love how it turned out! For more information on how to make this "toolbox", click {here}.

Happy Tuesday everyone!


Saturday, August 4, 2012

My New and Improved Word Wall!

This year, I decided to revamp the word wall in my classroom. I wish I had a before picture, but I never took one last year. Basically, I used LONG pieces of butcher paper  to create a large rectangle on the wall. This thing was probably 12' x 6'. It was a pain to hang up because you had to have at least 2 people hold the paper up and it took forever to add border to the perimeter. Last year, I would come into school in the morning to see that the entire top half of my word wall had come off the wall.

My awesome teammate, Kristin, used a completely different word wall in her classroom so I decided to create one like hers for this year. First, I bought a pack of 12"x12" scrapbook paper with colors that went with my classroom. Then, I cut the papers to be 8.5"x11" so I could print on them. I made a document on the computer that just had a large rectangle on the bottom half of the sheet. I printed the rectangles on the paper and then used punch-out letters to make the letters at the top. Last, I laminated and hung them up on the wall. Seriously, it took me about 10 minutes to hang the whole thing compared to about an hour that my old one did! In case you're wondering what the rectangle is for, I'm going to have my students draw a picture of a word that starts with each letter and then I will hang the picture in the rectangle. Here's a picture of my completed project:


As far as adding new words to the word wall, we have 5 sight words that we practice each week. I print these words on cards, hang them up on our front whiteboard, and we do several activities each week to practice them. Once the week is over, I add the 5 words to the word wall and then we start with 5 more the next week. One of the activities my students do to practice these words is use their whiteboards for about 10 minutes each day for our word wall routine. Here's how it goes:

1. The "word wall helper" (this is a student job in our classroom) leads the class at the front of the whiteboard with a pointer stick. Everyone else sits on the carpet with their own individual whiteboard, dry erase marker, and a sock (we use these as erasers!).
2. The word wall helper points to the word and the students SAY-SPELL-SAY-VISUALIZE-WRITE-CHECK.
3. First, they say the word aloud, spell it, and say it again.
4. Next, they visualize the word. They can do this 3 different ways but all 3 ways have to be done without talking. They can "air write" the word which means they use their finger to write the word in the air. They can "brain write" which means they close their eyes and visualize the word over and over in their head. Or they can "hand write" which means they use a finger to write the word over and over again on the palm of their hand. This only lasts for about one minute.
5. The next step is that the kids write the word on their whiteboard.
6. Last, the word wall helper spells the word aloud and everyone checks to make sure that they spelled it correctly. Once they've checked, they erase and we go onto the next word.

I know this probably sounds like it take forever, but once the students learn the routine, it only take about 10 minutes start to finish. It incorporates all types of learning styles- students hear the word, write it, trace it in the air, etc. I've had great success with my students learning their sight words and I know that this activity greatly helps! Plus, the kids LOVE being the word wall helper for the week. They get so excited to use the pointer stick and act like the teacher!

What are some fun ways that you have your students practice their sight words?


Friday, August 3, 2012

August Currently and 3 Back-to-School Must Haves

It's the first week of August (ahhh... panic mode!) and that means it's time for this month's Currently. Here's what's been on my mind lately:


Speaking of must haves for back-to-school, I thought I'd share a little more info about why these are so amazing!

1. Personal laminator- Who doesn't love the smell of hot lamination?! Seriously, this is the best thing that ever happened to my classroom. Not only does it help with getting ready for back to school, but I also use it to publish class books that we create throughout the year. The kids LOVE reading books that they've written as a class! Here is a picture of the laminator that I have:


If you don't have one of these bad boys, you need to get one ASAP! Mine is the GBC HeatSeal Laminator. When I tried out my teammate's, it was love at first sight and I knew I had to have one. Definitely worth every penny! (Do I send like an advertisement for this yet?!)

2. Thirty-One Hanging Organizer- I love all things related to organization, so when I went to a Thirty-One party and saw this, I thought that it would not only be great for home but also for school! I decided to hang mine on the bulletin board near my desk. You can hang a calendar on this, use the dry-erase board, organize papers, and keep track of your favorite pens or pencils! I can't wait to use it!


3. Reading with Meaning by Debbie Miller- I read this book a couple of summers ago and it completely changed the way that I teach reading. It taught me how to explicitly teach different reading strategies such as visualizing, predicting, inferring, along with many others. The book includes recommended book lists for each strategy and great examples of dialogue to use with your students. It is a great resource if you haven't read it yet!


Well, I hope you all are surviving this crazy hot/dry weather! My hubby and I went to the state fair today and just about died in the heat. Stay cool everyone =) And be sure to link up with Farley at Oh' Boy Fourth Grade!


Thursday, August 2, 2012

How To Create a Cozy Classroom {and a Sneak Peek!}


Creating a classroom where students feel safe, comfortable, and valued is so important to me. I also want my classroom to be cozy, because it is really their "home away from home" for about 10 months out of the school year! Over the past couple of weeks, I've been working in my classroom a little bit at a time and I thought I'd share some ideas for how to create a cozy classroom!


1. Curtains- Curtains make a classroom feel very homey. You can do either short or long curtains. Every year up until this year, I've done short curtains at the top of my windows. This year, I decided to try something different! I bought long red curtains at Wal-Mart, cut them off and sewed them so they were the right height and then added a polka dot tie-back. I love how they turned out! Curtains are such an easy way to change your classroom feel.


2. Chair Pockets- Adding chair pockets to your classroom provides color and functionality. These are very simple to make! I made 12 total for my classroom: 6 for my guided reading table, 3 for computer center, and 3 for writing center. These pockets will be used to hold activities for each center and books/reading response folders during guided reading. There are great tutorials all over the web for how to make these. I just made up my own as I went!


3. Classroom Rug- Adding a rug to your classroom is not only colorful and cozy, but it is also beneficial so that students know where your meeting area is. You can purchase large rugs at Wal-Mart, Target, or any other store that sells home decor items. I was lucky enough to have this amazing rug donated from some generous donors on DonorsChoose.org. If you don't know about this organization, you need to check it out {here}!


4. Paper Lanterns- I was so inspired by Schoolgirl Style when I saw these adorable paper lanterns on her website. These add a bit of whimsy to the classroom! I used matching ribbon to tie a bow at the top and then hung a table number below each lantern.


5. Ribbon- Speaking of ribbon, here are a couple of ways that I incorporate ribbon into my classroom. The picture on the left is a trash can that sits on top of each table. I found these adorable buckets at Garden Ridge. I used the same ribbon that is on the paper lanterns and tied a bow around the middle. The picture on the right is my calendar area. Using fun ribbon is a great way to hang pocket charts, posters, or anything else that you can think of! I used the green polka dot ribbon to hang my calendar and my Common Core posters.


 6. Wooden Bookshelves- I found this cute little bookshelf at a garage sale a few summers ago. It was in pretty bad shape but I knew it had potential! I painted it red and use it for my students' check-in area. They clip in here and also get their lunch envelopes from the baskets. Garage sales are great places to find cheap bookshelves that can be painted to match your classroom!


7. Pillows- Adding pillows to your classroom gives students comfy areas to sit and adds some coziness to your classroom. I love these pillows from Lakeshore Learning! They are great because they are easily cleaned and wiped off. (You know all about the germs that float around our classrooms!) The health inspector especially liked these pillows that weren't made of regular fabric =) I use these at my listening center so that students can sit and enjoy listening to a good book! I also had these donated to my classroom through DonorsChoose.org!


8. Plants- (Please don't mind the SOLO cup and label!) Plants are a great way to teach your students to take care of something and be responsible. They also enhance your classroom's appearance! This is actually a picture of a plant that we used during a science experiment, but if you look at the picture of the classroom curtains above, you will see the red pots that I use to hold our classroom plants. I just bought cheap clay pots and spray painted them red to go with my classroom. We have a classroom job called the "Plant Caretaker" who is charge of watering the plants each day. They love taking care of these and the plants just add a nice touch to the classroom.

Well that's about it! I know that you may not be able to do some of these ideas due to rules at your school (such as hanging things from the ceiling) but I hope this gave you some ideas for adding some coziness to your classroom! I will be posting more pictures of my classroom as I continue to work on it (there is still a long way to go!)

Have a great Thursday everyone!


Wednesday, August 1, 2012

My New {School} Year Resolutions

I can't believe it's August 1st already! Where did the summer go?! It's such a bittersweet time because I'm always excited for the new year but also sad about leaving my little guy. I get so attached to him during the summer. I know once I'm back in the swing of things, it will be okay though!

Now that I'm in full planning mode for the school year, I thought I'd share some of my resolutions with you! I'm linking up with Amanda Madden's New {School} Year Resolutions Linky.

 
Here is my list of resolutions (I know these are lofty goals, but I'm going to try!):
 
Resolution #1: Document interventions more often. Now that we are using the RTI process, I need to become better at documenting what I am doing to help my struggling students. I do lots of intervention, but just don't take the time to record it. I love this idea of a Student Intervention Kit that I found on Pinterest:
 
Pinned Image
Click {here} to download the freebies for this kit
 
Resolution #2: Be a great mentor for the new teacher joining our 2nd grade team! I am really excited to be mentoring again this year. When I first started teaching, I had a fabulous mentor who helped shape me into the teacher I am today. I want to do the same for my "mentee"!
 
Resolution #3: Be prepared! I need to really make a goal to stay after school and lay things out for the next day. This will make me feel so much more prepared the next morning.
 
Resolution #4: Teach the Common Core effectively! I am excited and anxious about transitioning the Common Core this year. My goal is to do the best I can this first year. I am set with all of my checklists and Common Core posters, so now I just need to teach it!
 
Resolution #5: Have more fun! It's easy to get bogged down by all of the stress from teaching. Planning, teaching, documenting, assessing, etc., etc., etc. can get crazy! This year, I'm going to really try to focus on the positives and have FUN!
 
Well, that's it! What are your new {school} year resolutions? Be sure to link up with Amanda Madden and share yours!
 
Have a great Wednesday everyone!