Wednesday, September 25, 2013

Helping Kids Understand the Three Properties of Addition

 
Since this is my first year teaching third grade, this was my first time teaching the three properties of addition- commutative, associative, and identity. I knew I was going to bore my kids (and myself!) if I just stated the properties and expected them to remember the meaning of each one. To make it a little more engaging, I used a pan balance, unifix cubes, and hand motions to explain each of the three properties.
 
First up was the Commutative Property of Addition. We discussed the base word in commutative- commute. I explained that my commute to work is the drive back and forth. To help remember that commute meant back and forth, we used the hand motion below:
 
 
After we practiced the hand motion a few times, I used unifix cubes to model how the Commutative Property works. On one side of the pan balance, I placed 3 purple cubes added to 5 black cubes (to represent 3 + 5). On the right side of the pan balance, I placed 5 black cubes added to 3 purple cubes (to represent 5 + 3).
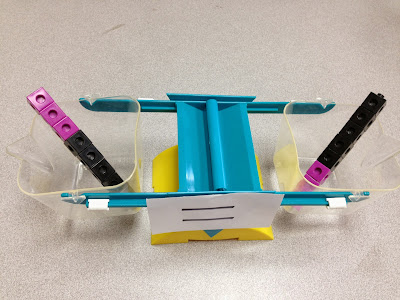
3 + 5 = 5 + 3
I then asked the students if the left side or the right side had more. Everyone agreed that there was the same amount. The kids drew the conclusion that it doesn't matter the order in which you add numbers, you will still get the same amount.

For the Associative Property of Addition, we also discussed the base word in associative- associate. I explained that associate means to put things together or to group them. I showed them an equation with parentheses and we talked about how the parentheses group numbers together and tell you to add them first. To remember the meaning of associate, we used the hand motion below:


Next, I used the pan balance and unifix cubes to model how the Associate Property works. On the left side of the balance, I placed 3 purple cubes on top of 2 green cubes next to 5 black cubes. On the right side, I placed 3 purple cubes next to 2 green cubes on top of 5 black cubes. This represented the equation ( 3 + 2 ) + 5 = 3 + (2 + 5).


( 3 + 2 ) + 5 = 3 + ( 2 + 5 )
I again asked the kids which side had more. They agreed that both sides were the same and drew their own conclusion that it doesn't matter how you group numbers together in an addition equation, the answer will still be the same.
 
Last up was the Identify Property of Addition. This is by far the easiest to understand and model! The hand motion that we used for the identify property is below:


This helped the kids remember that the Identify Property of Addition means "zero change" to the number. To model this property, I placed 6 purple cubes on the left side of the pan balance. I then demonstrated adding zero more (I used my hands to show that I wasn't adding any more!) I asked them which number should go on the right side of the pan balance to make both sides of the equation the same. They told me that I needed to add 6 purple cubes since the number didn't change. They drew the conclusion that any time you add 0 to a number, the number stays the same.


I taught this lesson yesterday in math and I was totally shocked to see that they remembered the meaning of each Property of Addition today! They were so excited to show me the hand motions and explain the rule for each one. I really think that using hand motions helps the kids to remember the meaning of each property, which in turn helps them apply it to a math equation.
 
On a side note- I really like using the pan balance to demonstrate addition and subtraction problems. All too often, kids assume that one side of the equal sign is the "answer". The pan balance, with a notecard taped to the middle, helps them understand that the equal sign really means "the same as." The first time that they see an equation such as 4 + 5 = 12 - 3, they are totally thrown off! The balance is a great visual to help them understand!


Sunday, September 22, 2013

Teaching Students How to SHOW not TELL in Writing

I was scared. I felt sad. I was really happy. Do these sentences sound familiar to you? These are the types of sentences my students were writing a couple of weeks ago when explaining how they were feeling in their writing. Now they are writing sentences such as, "My heart started pounding and my palms were sweaty." and "I jumped backwards and threw my arms up in the air!" Their writing is so much more interesting and they are really showing how they were feeling instead of just telling it.

So how did my third graders make this jump in their writing? Meet my newest unit, Now Showing... {A Unit on Showing not Telling in Writing}


To start off the unit, I showed my kids examples of telling and showing sentences. I asked them which type of sentence was more interesting to read. They all agreed that the showing sentences were more interesting. I then explained that over the next week or two, I was going to teach them how to show not tell feelings in their own writing.

The first activity that I did with my students is called "Feelings Charades." My students LOVED this activity and it really showed them how to describe a feeling in detail rather than just telling it.
Volunteers in our class acted out different feelings while the rest of the class recorded the body language/actions that they noticed (eg. hanging head, shuffling feet, shoulders hunched, etc.) This game helped my students understand how to "show not tell" a feeling in their writing. They loved acting out the feelings and were begging to do more than the six feelings I had planned.


After we finished the activity, I gave each student a "Showing Feelings Chart" to add to their writing binder. I explained that they could use this chart as a resource throughout the year if they needed help with showing a feeling. There are twelve different feelings explained on the chart.


Later in the week, I read many Patricia Polacco books to my students and had them listen for examples of "showing not telling." Patricia Polacco has many examples in one book alone. For example, in Chicken Sunday, there are 8 examples of a feeling being shown not told. Each of my students were assigned a different feeling before I read the book (different feelings were typed on cars and passed out to each student). While I was reading, they had to listen for an example of that feeling being shown. If they heard an example, they held up their card and we stopped the story to discuss how Polacco had described it. I love using mentor texts in writing workshop and Polacco's books are always so enjoyable for the students. Three of the books that I used in this unit are:


For each read aloud, I've included a chart of the "showing not feeling" examples and the page numbers that they can be found on. Also included in the unit are a brainstorming list, practice pages for students to turn telling sentences into showing sentences, and a recording sheet for students to write down showing sentences that they find while reading on their own. If you'd like to check out my unit on TpT, just click the image below!

Thursday, September 12, 2013

My Classroom Tour... Finally!

I am so excited to share my classroom this year with all of you! Since I am looping with my second graders from last year, I wanted to change up my classroom theme a little bit but didn't want to start completely over again. I spent a ton of time sewing and creating things for my room last year and couldn't bear the thought of not using it.

I came across Schoolgirl Style's Road Trip theme classroom décor set and knew that it would be a perfect fit for my third graders. A little more mature but still fun and colorful! I love the way it turned out =) Here are some pics from my new classroom...

 
In the hallway leading to my classroom door, I wanted a fun welcome message for my kids. I saw this idea on Pinterest {here} and fell in love with the hallway display! The cars were actually very easy to make and Melonheadz had the cutest faces clipart that I used for the little third graders in the cars!


Don't you just love pennants?! This welcome pennant is hanging right inside my classroom door.


I have this funky little corridor right inside my classroom door and wasn't quite sure what to do with it. Since I have a massive hallway display (the cute little cars) I decided that I needed a space to display my students' work. I used ribbon, mini clothespins, laminated sheets of black paper, and road trip nametags to make this display. It is so easy to change out student work using the clothespins!


Here is a close up of one of the student work displays. (Please don't mind my reflection in the paper!)


This is the area where I display our daily "I can" statements and anchor charts. I stole the idea for the magnetic curtain rods from Christina at Second Grade Sugar and Spice. It has worked for me very well so far! I'm always looking for more space to hang anchor charts and this idea was perfect!


This year, I'm using a vocab wall instead of a word wall. Each week, I introduce the new vocabulary terms as we learn them and add them to the wall. I refer to the words throughout the week and the kids use them for their vocabulary homework. To make the display, I just used ribbon and Velcro. The Velcro makes it really easy to change out the words each week.


Here is a close up of the vocabulary cards. Each card has the term, definition, and illustration of the word.


I wanted to keep the lanterns that I used in my classroom last year, but wanted to put a new twist on them. In Schoolgirl Style's décor set, there are postcards from all 50 of the states. I decided to name each table a different state using the postcards. My kiddos LOVE being called to the carpet by their state!


Okay, I have to admit something here- I went a little crazy over the summer buying chapter books for my classroom! With the transition to third grade (and the fact that most of my students have already read the majority of my books), I figured I needed to add many more chapter books. I found these amazing bins on Really Good Stuff and filled them up in no time!


Each student has their own chair pocket this year where they store their data notebooks. On each pocket, I put a license plate with the student's name. They are attached to the chair pockets with Velcro so I can easily switch them out!


Here is our "Road Trip Through the Writing Process" bulletin board! My students always seem to think that once they write their draft in writing workshop, they are done. Does anyone else hear me on this?! I thought my kiddos could use a visual reminder of the ENTIRE process!


This is our student computer center. Nothing fancy, but my students LOVE when it is their day on the computer!


I HATE clutter. So last year, I made this curtain to cover up the last few cubbies that I wasn't using. Behind the curtain, there is stuff shoved everywhere! With very limited storage space, I have to hide things anywhere I can!


Okay, can I just tell you that I am in love with this 5 drawer organizer? One of my biggest issues last year was trying to manage my turn-in basket. It would get so full with papers all mixed up and out of order. This organizer from Really Good Stuff is FABULOUS. Each drawer has a different label (morning work, math, word study, reading, and other). It has really helped me stay on top of grading papers. I couldn't live without this thing!

Alright, you made it to the end of my tour! I hope you enjoyed checking out my classroom!