Saturday, February 21, 2015

Cursive Writing Using the Train-Trace-Try Method!

Cursive writing. Everyone has their opinions on whether to teach it to students or not. My personal opinion is that cursive writing is still important for kids. Even though it probably doesn't need as much emphasis as we've put on it in the past, there are several reasons why kids need to be able to read and write in cursive.

Here is a great article from TIME magazine that discusses 5 reasons kids should still learn cursive writing. Two of the most important reasons, in my opinion, include:

1. Students need to be able to sign their name on important documents, job applications, and more.


2. Kids should be able to read cursive writing for a variety of reasons. Letters from grandma, important historical documents, etc.

Okay, I'm getting off my soapbox now! For the past couple of years, I've been teaching cursive writing to my third graders. I didn't love the way I was teaching it and wished that I had more resources to use with my kiddos. So I started doing some research about the cursive writing verbal paths and other strategies to use with students and then put together a COMPLETE Cursive Writing Pack!


This pack is unique in the fact that it uses a strategy called Train-Trace-Try. I came up with these three words after thinking about how we need to scaffold cursive writing instruction. First, students need to be trained how to form each letter. This is where the verbal paths come in.


In the train step, students can either trace the letter with their finger or with a pencil but the most important part is that they are saying the verbal path in their head each time they form the letter. Saying this over and over again will help the kids remember the formation.

In the trace step, students can trace the letter several times.


I've actually found that it's more motivating to students to use a colored pencil during this step. They can see their writing easier and it's fun to use different colors! I encourage my students to still say the verbal path in their head as they trace the letters.


The last step on each page is to try. In this step, students will try to form letters and words on their own. This is an important step because the kids learn how to link the letters together to form words.


You can have your students use a regular pencil or a colored pencil for the step. I especially like the Crayola Erasable Colored Pencils. 


Also included in this Cursive Writing Pack are lowercase and capital letter posters to display in your classroom.


To see what all is included, check out the previews below! If you'd like to grab a copy of this cursive writing pack, click here!


Wednesday, November 5, 2014

Throw Those Math Key Words Out the Window!

Total. Difference. Left. Altogether. You know what I'm talking about. The math key words used to teach kids to solve word problems in math. I can picture a certain poster that I used to use when teaching these key words. It was all cutesy with locks and keys (smiling, of course!) and all the key words that would help you magically get the solution to any word problem. I'm going to challenge you to throw those key words out the window. They're not helping kids even though we have good intentions.

Think about the following word problem:

Brandon took 6 baseball cards that he no longer wanted and gave them to Benny. Now Brandon has 10 cards left. How many baseball cards did Brandon have to start with?

When we think of the word left, we typically associate it with subtraction. In the word problem above, however, addition is the operation that you would need to use to solve the problem. Teaching kids to rely on key words doesn't encourage kids to visualize the problem and think about it's structure. It merely teaches kids to hunt for words and solve without making sense of the problem.

Here's another example of how key words can be misleading:

Megan made $25 during the bake sale. Afterwards, she had to pay $5 for renting the table. What is Megan's new total of money earned?

Again, kids would see the word total and automatically assume that they need to add. However, adding the two numbers together wouldn't give a reasonable answer. This is why we need to get away from using key words and instead focus on the structure of the problem. Acting the problems out and getting kids to visualize the problem is helpful (and fun!) for students.

In the Common Core standards, teachers are encouraged to teach students the 5 common addition and subtraction situations. I like how this statement focuses on the word situations and not key words. The five common situations include: add to, take from, put together, take apart, and compare. I try to use these terms with my students from the beginning of the year and they are really helpful. Here's a brief explanation of each of the situations:

Add To: an amount is added on to another
Example- "I have 52 baseball cards. My friend gave me 37 more. How many cards do I have now?"

Take From: an amount is taken from another
Example- I had 145 baseball cards. I lost 25 of them. How many baseball cards do I have now?"

Put Together: two amounts are put together
Example- Sam bought 67 baseball cards. Max bought 32 baseball cards. How many cards did both boys purchase?"

Take Apart: the total amount is taken apart
Example- There are 238 trading cards at the store. 100 are baseball cards. How many are not baseball cards?"

Compare: two amounts are compared to see how many more or how many less
Example- Walmart has 115 baseball cards. Target has 102 baseball cards. How many more cards does Walmart have?

If you'd like a free set of posters matching these situations, click on the picture below. Enjoy! (And throw those key words out the window!)


Tuesday, November 12, 2013

Helpful Hints!

The teachers of Blog Hoppin' are hosting a week long linky party! I'm so excited to participate in today's linky- H is for Helpful Hints.

http://imbloghoppin.blogspot.com/2013/11/h-is-for-helpful-hints-linky-party.html

I've got three helpful hints for you today...


My students use to always argue over whose turn it was to be on the computer. We only have 3 student computers and 20+ students. I decided to assign each student a computer for an entire day. Each card has the student's name on the front and their individual login information on the back. The cards are hole punched and hooked together with a book ring. Each ring of cards hangs from a 3M hook on the computer. My students know each day whose turn it is for the computers and can even check to see when their next day is going to be. It's also really handy having their login information on the back of their card to eliminate questions, disruptions, etc. So easy!


Last year, I used one turn-in basket for all of my students' completed work. It was a nightmare! The basket would pile up, I'd have to sort the papers, and I'd get overwhelmed and procrastinate with grading (sound familiar?!) This year, I found this really neat 5-basket organizer from Really Good Stuff. I thought about labeling each basket with the days of the week but decided to organize them by subjects. I have mine organized into the following five categories: morning work, math, word study, reading, and other. This has been such a tremendous help in managing papers to grade. It's not so overwhelming and the papers are already organized at the end of each day. I love it!


We all know that classroom storage space is limited so we have to get creative when it comes to hiding storing all of our materials! An easy way to do this is to use the extra cubby space in your classroom. If you have a couple of empty cubbies, use a piece of fabric and Velcro to cover the extra space. You can store a ton of materials by doing this! Whenever you need something, just pull back the fabric, grab what you need, and velcro the fabric back on. It's so simple and looks cute too!

Alright, those are my helpful hints for today! Tomorrow I hope to blog about activities that I love to use in my classroom. Be sure to head over to Blog Hoppin' and check out all of the helpful hints being shared!

Monday, November 4, 2013

Using Trifolds in Guided Reading

Does anyone else struggle with holding your kids accountable for reading their guided reading chapter books? Or what about keeping them focused on a strategy while reading their assigned chapters on their own? These are two of the biggest issues that I face with my guided reading groups. To help with this problem, I started using trifolds to help keep my kids on track while they went back to their seat to read on their own. These have proven to be really helpful for my kids in so many ways. They now know exactly what to focus on when they are reading, they have opportunities to record their thinking, and we are able to have meaningful discussions about our reading when we meet as a guided reading group again.


Here are some tips for using guided reading trifolds in your classroom: (I'm not an expert, these are just things that work for me!)

1. Focus on a specific reading strategy for the majority of the book

This is something that I've learned over the years while teaching guided reading. Instead of changing the focus every chapter of the book, decide on a specific strategy to use for the majority of the book. This is less confusing for the kids and helps them focus on using the strategy over an extended period of time. Find a book that really lends itself to the strategy/skill that you are teaching. For example, in one of my groups we are focusing on inferring character traits. I thought about which book would really lend itself to teaching character traits and decided on Because of Winn Dixie. In this book, you really get to know the characters and there are lots of different traits that can be used to describe each one.

2. Explicitly teach each reading strategy/skill before using the trifold

A great way to do this is to use think-alouds. I love to read books aloud to my kiddos (during our reading workshop minilessons) and think-aloud for my students. It really models the thinking that goes on while reading. Before having the kids practice the skill independently on their own using the trifolds, allow them many opportunities to hear you think-aloud and to discuss their own thinking as a whole group. Once students understand the skill/strategy that you are teaching, you can have them try it independently using the trifolds in guided reading.

 
3. Plan for time in your guided reading groups to discuss each student's writing in their trifolds
 
Do you have times in guided reading when you ask the group a question (What is a summary of this chapter? How would you describe Winn Dixie?) and all you get is blank stares? Ahhh!! It drives me crazy! These trifolds allow you to have meaningful conversations with your students using the writing that they recorded while reading independently. Instead of the blank stares, students are looking at their writing and sharing their thinking with others in the group. This is so powerful! I always encourage each student to use evidence from the book to support their thinking (see the example below where a student referred to a part in the book and wrote down the page number). This makes discussing each chapter so much easier!


If you are interested in learning more about using guided reading trifolds, you can check out the product below that includes trifolds for 11 different strategies (character traits, character feelings, inferring, questioning, summarizing, making connections, making predictions, setting, unknown words, visualizing and sequencing). The download also includes posters to use while teaching each strategy. Just click on the picture below to see more views of everything that is included!
 
http://www.teacherspayteachers.com/Product/Guided-Reading-Trifolds-and-Strategy-Posters-For-Use-with-ANY-Chapter-Book-958201
 

Saturday, November 2, 2013

November Currently!

I absolutely can't believe that it's November already! I love this time of year and everything that comes with it (well except grade cards). I've linked up with the wonderful Farley at Oh' Boy Fourth Grade for her November Currently. Here's what I am currently up to...


Listening- As soon as it hits November, I give myself permission to start listening to Christmas music. Anyone else???? I know it sounds crazy but it just makes me so happy =)

Loving- I NEVER get to sleep in. It seems as though my son wakes up earlier the later he goes to bed the night before. Today, however, was an exception. I couldn't believe it when I looked at my phone and realized it was 9:30. Pure bliss!

Thinking- I only have two more months to prepare for this little girl! We are so absolutely excited to welcome our little Makenna Grace into this world!

Wanting- Have you had a three day weekend yet? We haven't and I am DYING for one. I always feel like I just need one more day each weekend.

Needing- I DESPISE grading papers. I wish I would be better about grading them periodically but I always end up procrastinating right up until grade cards. Oh well!

A Yummy Pin- Easy No Bake Peanut Butter Bars. These are absolutely delicious! I've made them several times and they really only take a couple of minutes and a couple of ingredients.

 
Here is the pin from Pinterest: http://www.pinterest.com/pin/97320041919569838/
 
And the website where the recipe came from:
 

http://www.sixsistersstuff.com/2012/03/easy-no-bake-peanut-butter-bars.html

You will be thanking me for these- they are amazing! Alright, that's it folks! Be sure to check out Farley's linky and see what everyone else is currently up to =)

Sunday, October 27, 2013

5 Kinds of Number Stories Posters FREEBIE!

Do your students struggle with tackling number stories? This is an area of math that my students always have difficulty with. In the new Common Core standards, it says that students need to be able to solve one and two-step word problems involving situations of adding to, taking from, putting together, taking apart, and comparing.

To help my students with these problems, I decided to explicitly teach the five types of number stories. I created a poster for each kind and we did a lot of practice identifying the 5 types in various word problems and discussing which operation to use to find the answer. This has made such a difference for my students! Number stories are no longer a mystery for them and they are able to tackle them much more easily.

If you'd like to grab a copy of the posters that I created, just click on the picture below. They are FREE! I hope the posters help your students as much as they helped mine. Enjoy! =)

Wednesday, September 25, 2013

Helping Kids Understand the Three Properties of Addition

 
Since this is my first year teaching third grade, this was my first time teaching the three properties of addition- commutative, associative, and identity. I knew I was going to bore my kids (and myself!) if I just stated the properties and expected them to remember the meaning of each one. To make it a little more engaging, I used a pan balance, unifix cubes, and hand motions to explain each of the three properties.
 
First up was the Commutative Property of Addition. We discussed the base word in commutative- commute. I explained that my commute to work is the drive back and forth. To help remember that commute meant back and forth, we used the hand motion below:
 
 
After we practiced the hand motion a few times, I used unifix cubes to model how the Commutative Property works. On one side of the pan balance, I placed 3 purple cubes added to 5 black cubes (to represent 3 + 5). On the right side of the pan balance, I placed 5 black cubes added to 3 purple cubes (to represent 5 + 3).
3 + 5 = 5 + 3
I then asked the students if the left side or the right side had more. Everyone agreed that there was the same amount. The kids drew the conclusion that it doesn't matter the order in which you add numbers, you will still get the same amount.

For the Associative Property of Addition, we also discussed the base word in associative- associate. I explained that associate means to put things together or to group them. I showed them an equation with parentheses and we talked about how the parentheses group numbers together and tell you to add them first. To remember the meaning of associate, we used the hand motion below:


Next, I used the pan balance and unifix cubes to model how the Associate Property works. On the left side of the balance, I placed 3 purple cubes on top of 2 green cubes next to 5 black cubes. On the right side, I placed 3 purple cubes next to 2 green cubes on top of 5 black cubes. This represented the equation ( 3 + 2 ) + 5 = 3 + (2 + 5).


( 3 + 2 ) + 5 = 3 + ( 2 + 5 )
I again asked the kids which side had more. They agreed that both sides were the same and drew their own conclusion that it doesn't matter how you group numbers together in an addition equation, the answer will still be the same.
 
Last up was the Identify Property of Addition. This is by far the easiest to understand and model! The hand motion that we used for the identify property is below:


This helped the kids remember that the Identify Property of Addition means "zero change" to the number. To model this property, I placed 6 purple cubes on the left side of the pan balance. I then demonstrated adding zero more (I used my hands to show that I wasn't adding any more!) I asked them which number should go on the right side of the pan balance to make both sides of the equation the same. They told me that I needed to add 6 purple cubes since the number didn't change. They drew the conclusion that any time you add 0 to a number, the number stays the same.


I taught this lesson yesterday in math and I was totally shocked to see that they remembered the meaning of each Property of Addition today! They were so excited to show me the hand motions and explain the rule for each one. I really think that using hand motions helps the kids to remember the meaning of each property, which in turn helps them apply it to a math equation.
 
On a side note- I really like using the pan balance to demonstrate addition and subtraction problems. All too often, kids assume that one side of the equal sign is the "answer". The pan balance, with a notecard taped to the middle, helps them understand that the equal sign really means "the same as." The first time that they see an equation such as 4 + 5 = 12 - 3, they are totally thrown off! The balance is a great visual to help them understand!


Sunday, September 22, 2013

Teaching Students How to SHOW not TELL in Writing

I was scared. I felt sad. I was really happy. Do these sentences sound familiar to you? These are the types of sentences my students were writing a couple of weeks ago when explaining how they were feeling in their writing. Now they are writing sentences such as, "My heart started pounding and my palms were sweaty." and "I jumped backwards and threw my arms up in the air!" Their writing is so much more interesting and they are really showing how they were feeling instead of just telling it.

So how did my third graders make this jump in their writing? Meet my newest unit, Now Showing... {A Unit on Showing not Telling in Writing}


To start off the unit, I showed my kids examples of telling and showing sentences. I asked them which type of sentence was more interesting to read. They all agreed that the showing sentences were more interesting. I then explained that over the next week or two, I was going to teach them how to show not tell feelings in their own writing.

The first activity that I did with my students is called "Feelings Charades." My students LOVED this activity and it really showed them how to describe a feeling in detail rather than just telling it.
Volunteers in our class acted out different feelings while the rest of the class recorded the body language/actions that they noticed (eg. hanging head, shuffling feet, shoulders hunched, etc.) This game helped my students understand how to "show not tell" a feeling in their writing. They loved acting out the feelings and were begging to do more than the six feelings I had planned.


After we finished the activity, I gave each student a "Showing Feelings Chart" to add to their writing binder. I explained that they could use this chart as a resource throughout the year if they needed help with showing a feeling. There are twelve different feelings explained on the chart.


Later in the week, I read many Patricia Polacco books to my students and had them listen for examples of "showing not telling." Patricia Polacco has many examples in one book alone. For example, in Chicken Sunday, there are 8 examples of a feeling being shown not told. Each of my students were assigned a different feeling before I read the book (different feelings were typed on cars and passed out to each student). While I was reading, they had to listen for an example of that feeling being shown. If they heard an example, they held up their card and we stopped the story to discuss how Polacco had described it. I love using mentor texts in writing workshop and Polacco's books are always so enjoyable for the students. Three of the books that I used in this unit are:


For each read aloud, I've included a chart of the "showing not feeling" examples and the page numbers that they can be found on. Also included in the unit are a brainstorming list, practice pages for students to turn telling sentences into showing sentences, and a recording sheet for students to write down showing sentences that they find while reading on their own. If you'd like to check out my unit on TpT, just click the image below!

Thursday, September 12, 2013

My Classroom Tour... Finally!

I am so excited to share my classroom this year with all of you! Since I am looping with my second graders from last year, I wanted to change up my classroom theme a little bit but didn't want to start completely over again. I spent a ton of time sewing and creating things for my room last year and couldn't bear the thought of not using it.

I came across Schoolgirl Style's Road Trip theme classroom décor set and knew that it would be a perfect fit for my third graders. A little more mature but still fun and colorful! I love the way it turned out =) Here are some pics from my new classroom...

 
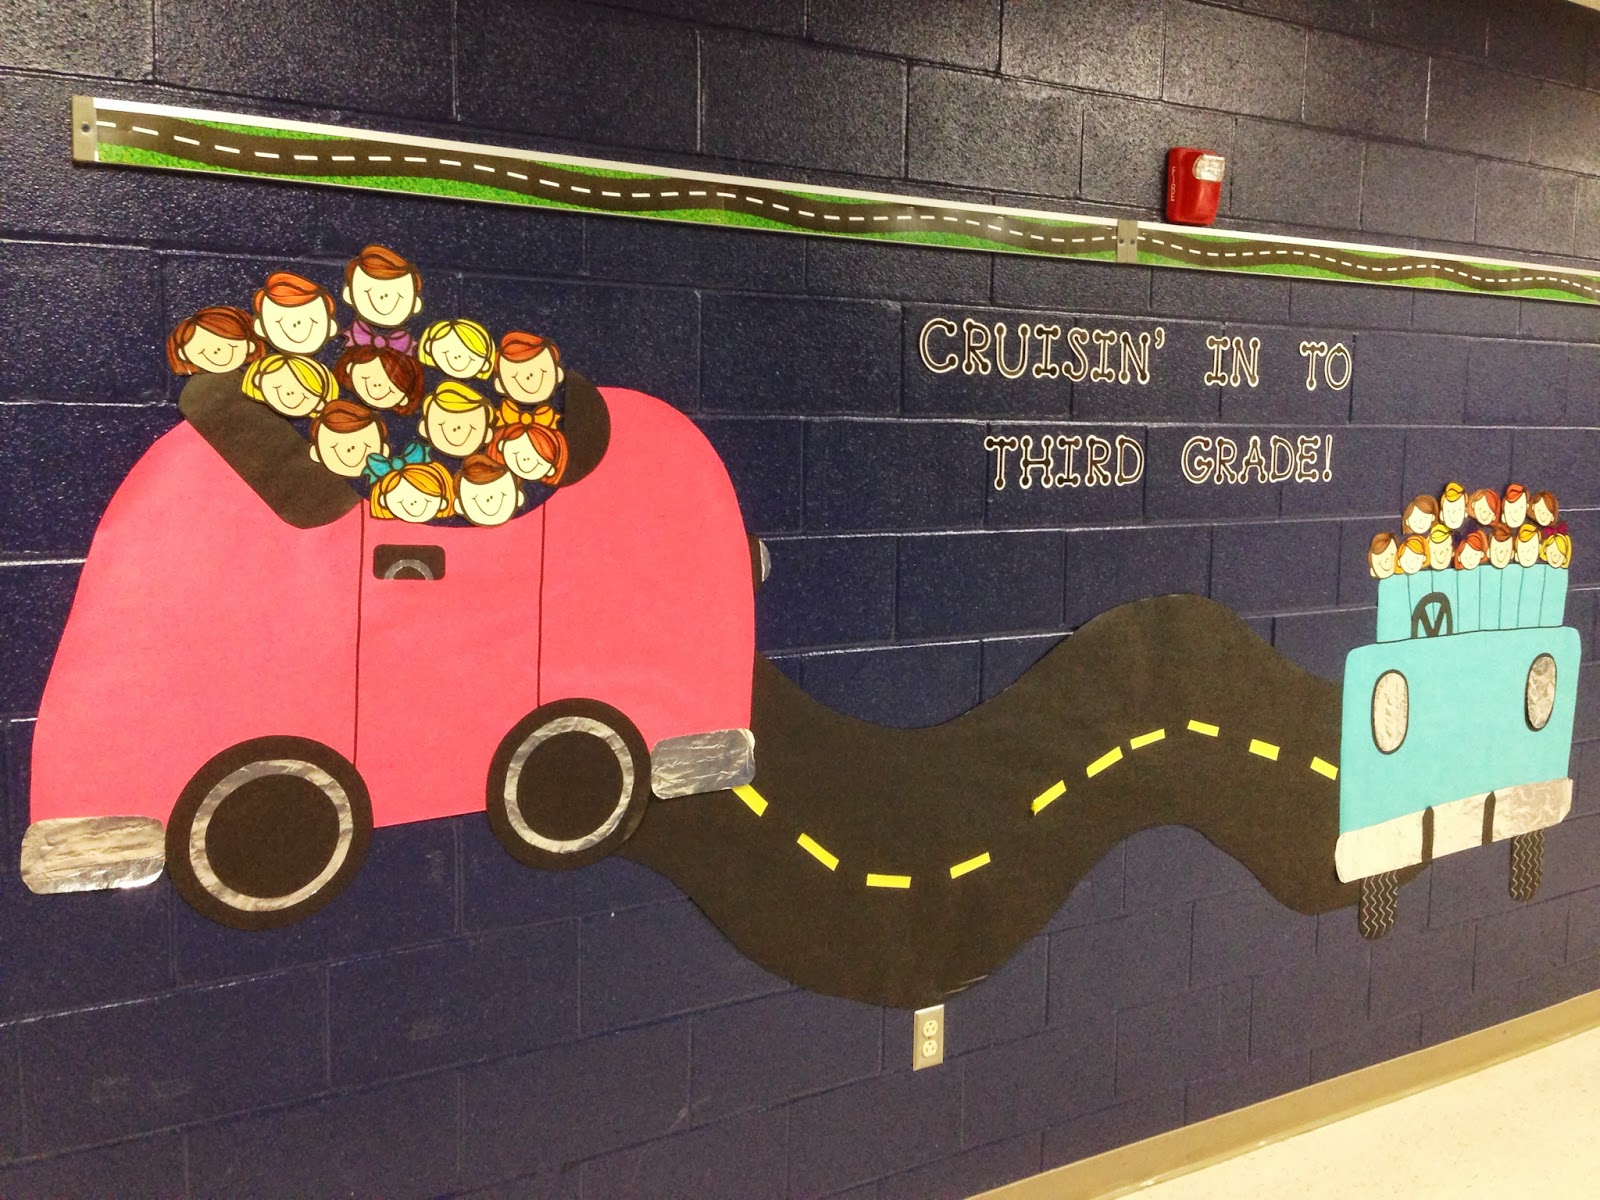
In the hallway leading to my classroom door, I wanted a fun welcome message for my kids. I saw this idea on Pinterest {here} and fell in love with the hallway display! The cars were actually very easy to make and Melonheadz had the cutest faces clipart that I used for the little third graders in the cars!


Don't you just love pennants?! This welcome pennant is hanging right inside my classroom door.


I have this funky little corridor right inside my classroom door and wasn't quite sure what to do with it. Since I have a massive hallway display (the cute little cars) I decided that I needed a space to display my students' work. I used ribbon, mini clothespins, laminated sheets of black paper, and road trip nametags to make this display. It is so easy to change out student work using the clothespins!


Here is a close up of one of the student work displays. (Please don't mind my reflection in the paper!)


This is the area where I display our daily "I can" statements and anchor charts. I stole the idea for the magnetic curtain rods from Christina at Second Grade Sugar and Spice. It has worked for me very well so far! I'm always looking for more space to hang anchor charts and this idea was perfect!


This year, I'm using a vocab wall instead of a word wall. Each week, I introduce the new vocabulary terms as we learn them and add them to the wall. I refer to the words throughout the week and the kids use them for their vocabulary homework. To make the display, I just used ribbon and Velcro. The Velcro makes it really easy to change out the words each week.


Here is a close up of the vocabulary cards. Each card has the term, definition, and illustration of the word.


I wanted to keep the lanterns that I used in my classroom last year, but wanted to put a new twist on them. In Schoolgirl Style's décor set, there are postcards from all 50 of the states. I decided to name each table a different state using the postcards. My kiddos LOVE being called to the carpet by their state!


Okay, I have to admit something here- I went a little crazy over the summer buying chapter books for my classroom! With the transition to third grade (and the fact that most of my students have already read the majority of my books), I figured I needed to add many more chapter books. I found these amazing bins on Really Good Stuff and filled them up in no time!


Each student has their own chair pocket this year where they store their data notebooks. On each pocket, I put a license plate with the student's name. They are attached to the chair pockets with Velcro so I can easily switch them out!


Here is our "Road Trip Through the Writing Process" bulletin board! My students always seem to think that once they write their draft in writing workshop, they are done. Does anyone else hear me on this?! I thought my kiddos could use a visual reminder of the ENTIRE process!


This is our student computer center. Nothing fancy, but my students LOVE when it is their day on the computer!


I HATE clutter. So last year, I made this curtain to cover up the last few cubbies that I wasn't using. Behind the curtain, there is stuff shoved everywhere! With very limited storage space, I have to hide things anywhere I can!


Okay, can I just tell you that I am in love with this 5 drawer organizer? One of my biggest issues last year was trying to manage my turn-in basket. It would get so full with papers all mixed up and out of order. This organizer from Really Good Stuff is FABULOUS. Each drawer has a different label (morning work, math, word study, reading, and other). It has really helped me stay on top of grading papers. I couldn't live without this thing!

Alright, you made it to the end of my tour! I hope you enjoyed checking out my classroom!